The goal of tool-making is to make users do certain works more efficiently. A functional tool with poor designed interface would not be fully utilized by users, because users aren’t willing to use that tool if the interaction makes them feel frustrated.
Developing is a Iterative Process
Although there are a few principles about user interface design, but it doesn’t mean that we can simply apply those principles and get our jobs done. In day-to-day situations, tool-development is a iterative process. As a developer, we’d better continuously communicate with our target users, and do some modifications according to the feedback, and repeat those processes back and forth until users’ workflows are truly improved. (In my personal experience, the much users like our tool, the more feedback they will give us.)
Functionalities and User-Interface
In early development stage, we might change the interface design frequently. In order to make our life easier, we’d better avoid putting all these codes into a single Python script. We can decompose the source codes to two primary parts: one is the underlying functionalities, the other is for layout design. This loose-coupling idea make us possible to redesign the layout without amending any code for underlying functionalities. Besides, the code is easier to maintain, because we can focus on each part respectively without worrying about other interferences.
Furthermore, when we develop a tool with more complicated functionalities and interactions, it would be better to adopt the Model-View-Controller pattern. It separates the logic into data accessing model, view presentation and the interaction between them.
More Information about MVC
Workflow

- Design the custom UI layout with QtDesigner
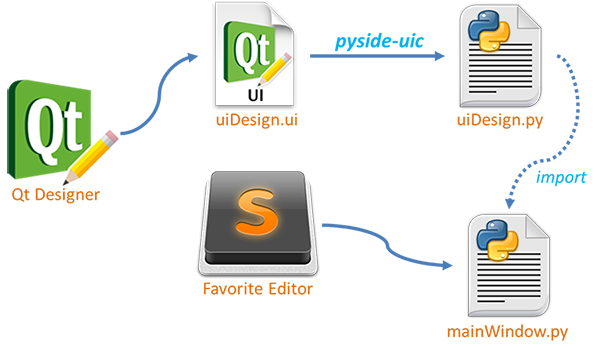
- Compile ui file to py script
- Combine the design and functionality
- Invoke the UI from Script Editor
- Update the Layout via reload() The example files can be downloaded here.
Design the custom UI layout with QtDesigner
- The designer is shipped with Maya, we can find it in $(MAYA_ROOT)\bin\designer.exe
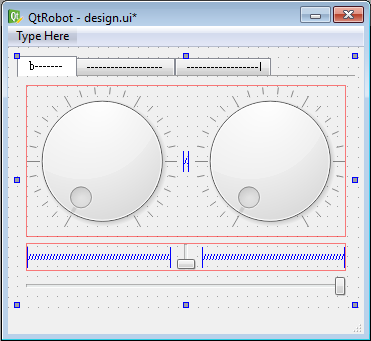
- We can simply design the layout via the drag-and-drop interface. (Learn more about QtDesigner)

- We could also setup the signal/slot relationship in designer.
- Here we make the rightDial synced with leftDial

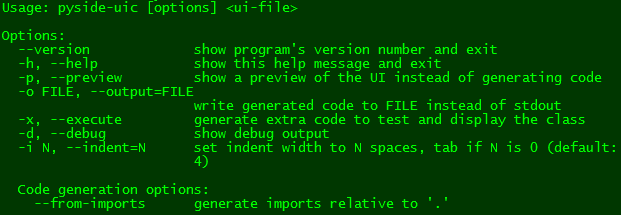
Compile ui file to py script
$(MAYA_BIN)\mayapy $(MAYA_BIN)\pyside-uic design.ui -o uiDesign.py

Combine the design and functionality
Create a new file mainwin.py and
- Import
uiDesign.pywhich is compiled fromdesign.uipreviously. line#7 - Inherit the mixin class (e.g. Ui_RobotWindow) and invoke
self.setupUi()to create the layout. line#13-16 - Connect signal to proper slots which are responsible for each specific task respectively. line#19
#!/usr/bin/env python
import sys

from PySide.QtCore import *
from PySide.QtGui import *
from shiboken import wrapInstance
import uiDesign
reload(uiDesign)

import maya.cmds as cmds
import maya.OpenMayaUI as omui

class RobotWindow(QMainWindow, uiDesign.Ui_RobotWindow):
    def __init__(self, parent=None):
        super(RobotWindow, self).__init__(parent)
        self.setupUi(self)

        # Setup signal/slot connections...
        self.horizontalSlider.valueChanged.connect(self.setCurrentTime)

    def setCurrentTime(self, value):
        minTime = cmds.playbackOptions(q=True, min=True)
        maxTime = cmds.playbackOptions(q=True, max=True)
        time = (maxTime - minTime) * value / 100
        cmds.currentTime(time, e=True)

def initUi():
    mayaMainWindowPtr = omui.MQtUtil.mainWindow()
    mayaMainWindow = wrapInstance(long(mayaMainWindowPtr), QWidget)
    # Create a instance of our RobotWindow and set its parent
    # to the main window of Maya.
    myWin = RobotWindow(mayaMainWindow)
    myWin.show()
Make sure to parent our widget under an existing Maya widget (such as Maya’s main window). Otherwise, if the widget is un-parented, it may be destroyed by the Python interpreter’s garbage collector when a reference to it is not maintained.
Invoke the UI from Script Editor
import sys
sys.path.append(r'DIR_PATH_TO_THE_SCRIPTS')
import mainwin as MyMainWin
MyMainWin.initUi()
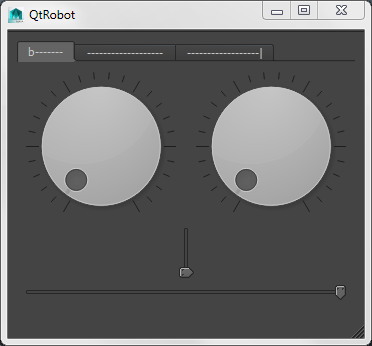
If everything works fine, we should see a window with robot face with following features:

- Left dial (eye) will trigger the movement of right dial
- The bottom slider (mouth) controls the current time in the range of Maya’s playback slider
Update the Layout via reload()
When we want to update the latest layout from design.ui, the first thing is to compile it to uiDesign.py via pyside-uic. Then, we’ve to reload the module uiDesign AND mainwin to make sure all definitions are up-to-date. Why do we need to reload both modules? Let’s check the reload() in docs:
When reload(module) is executed, other references to the old objects (such as names external to the module) are not rebound to refer to the new objects and must be updated in each namespace where they occur if that is desired.
If a module instantiates instances of a class, reloading the module that defines the class does not affect the method definitions of the instances — they continue to use the old class definition. The same is true for derived classes.
In other words, if we only reload mainwin, it would not update the uiDesign because the module uiDesign is imported within the mainwin. In addition, if we only reload uiDesign, the instance of RobotWindow is still using the old definition of uiDesign. That’s why we need to reload them both, however, in order to save manual steps for updating, I simply put reload(uiDesign) in line#8. Thus we could get the up-to-date result every time we reload the mainwin.
Few discussions about reload() @stackoverflow:
- reloading dependent modules in Python
- how to find list of modules which depend upon a specific module in python
- reload component Y imported with ‘from X import Y’?
References
comments powered by Disqus